I hope you had a nice weekend!
We did some garage saleing and hung out by the pool most of the weekend. Every so often I would sneak away to "make" a console table. And when I say I "made" a table, I mean I... oh I don't know... I added wood to an existing table to make it look the way I wanted it to.
So what would you call that?
Anyways, I started off with this old table...
(picture was taken with cell phone back when camera didn't work)
I have had this table for about 15 years. I bought it at a garage sale for $25 for our first home. It's small table and doesn't really go with my decor right now, so instead of getting rid of it, I thought to modify it!
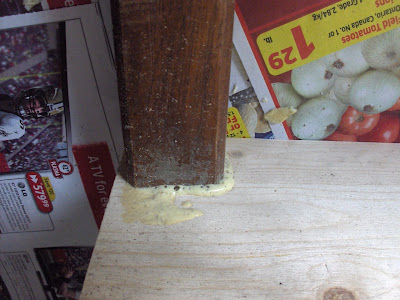
I added a piece of wood that I had cut to size at home Depot to the bottom of the original legs with Gorilla glue. Something I learned during this project is that you only need a little bit of glue! >:(
Then I sanded... and....
Sanded. I wanted rounded corners.
Then I added little "legs" to the bottom and sprayed it with KILZ primer.
Once KILZ was dry, I filled in all of the cracks with wood filler.
Then I sprayed the whole thing with a Black Satin and re-sanded the corners once paint was dry to let the white primer show through. And added a new drawer handle.
And Introducing our new hall Console Table... "made by me"!!
Here's the before again...
And now the after...
Not bad huh? I'm letting the paint "cure" in the hallway before I dress it up.
The extra materials cost me about $25 in addition to the $25 I spent back in 1995. I love it!
I'm linking my console table to some of these partaaays!
And now for the Shaklee winners of the Basic H2 Sample!
Congratulations to:
"Amber", "Esther", "Savannah Smiles", "Bee Cute" and "LoriD".
I'll be in touch today ladies!
So... what did you do this weekend.


27 comments:
The table looks amazing! I need to use more spray paint - I really don't like finishing the stuff I make. I spent Saturday painting my front door and building a bench for my entrance. The bench still needs some work, but I'll share when I'm done.
The table looks amazing! Thanks for the tutorial! This is a skill I wish I had! I would love if you would be willing to post on my linky party! http://jandeecrafts.blogspot.com/
Hope to see ya there!!
Emily
Wow... amazing job! Thank you for participating in our "Show Off Your Cottage Monday" and letting us into your home...
cielo
this is so fantastic!
You did a fabulous job on that table. I know you must have put a lot of hours into that. Isn't it worth it when something comes out so great!!!
Nicely done. Now that took a bit of work but the result was well worth it. I was drawn in immediately by the black and white color. Visiting via The Girl Creative
Pam
awesome! It looks amazing!
Great job, it looks great!!!
that's definitely a fantastic transformation! Just love the new look!
Great job,
Kathy
Stopping by from Metamorphosis Monday! Love how this table turned out! Great job inserting a shelf!
That table turned out fabulous! You are so talented.
wow! what a great transformation! you did such an jmpressive job, and i love your new colour choice too! way to go!
Great idea! So original
That takes guts and hard work! Fabulous job...love the shelf you added on the bottom...thanks so much for linking up to Style Feature Saturday! -shaunna :)
It turned out fabulous! Way to go with adding the shelf, that took some work. Thanks for sharing it!
Look'n good! Thanks for linking up to Mad Skills Monday!
Great makeover project! I really like the way the edge detail finished it off!
Thanks for sharing (found you at BNOTP MM link party!)
:D Lynda
I'm impressed. The table has a whole new look-like something out of a Pottery Barn catalogue. Very nicely done!
Wonderful project. I understand what you mean about Gorilla Glue - I used too much on chair rungs and don't think it will ever come off properly.
brilliant! it turned out really awesome!
gail
Your table is amazing! Thanks for linking up.
Becca
becca-homeiswheremystorybegins.blogspot.com
Great job! I am going to feature you!
Bonnie :)
Great job! What a fabulous idea.
Thanks for joining us at "AP Tuesdays!" @ New Nostalgia! Hope to see you again tomorrow!
New follower!! This is fabulous, I never would have thought of this, wow!
lifeofperks.blogspot.com
OOPS--you entered your key link to the DIY Club party event, so I need to have you do 2 things-
1) Go to the Gorilla Glue site and pull a picture of the glue product that you used and add it to this post(if you didn;t take a picture of Gorilla Glue while doing this project)
2) Add this link to the party instead of the KEY link.
Wow! That is an awesome little table. I love it. How did you attach the new legs/feet?
I'm now a follower.Stop by my blog sometime. :)
Post a Comment